
Installing shingles is a skill that requires patience. You want to get it right to keep your home dry and looking good. We will share some top tips on how to tackle the project yourself.
If you get stuck, do not hesitate to call Big Easy Roofing; we can save you time and trouble.
Preparing your roof for new shingles involves more than just laying them down. You have to:
To do the job right, you need the proper tools: a hammer, roofing nails, a utility knife, a ladder, a chalk line, and a tape measure.
If you don’t have them, your local hardware store can help. Keeping these tools nearby helps you stay focused and saves you time by avoiding interruptions in searching for them.
You are going to need shingles, but you cannot forget the underlayment and starter strips. Your starter strip is very important in securing those shingles together.
Select shingles with a style and for your roof’s climate. Properly installed shingle roofs can protect your house for decades so make wise selections.
So, safety first folks! Before you reach out for that rung, you want to be geared up with personal protective equipment (PPE). That means a hard hat, eye protection, gloves, and non-slip footwear.
These aren’t just nice-to-haves; they’re must-haves. Falling off of a roof is no joke, and these items help keep you safe. It’s also nice to know what’s going on with the weather.
Don’t roof in wet conditions. Make sure you don’t miss this step and at least allow 24 hours for moisture to evaporate.
These are important to prevent falls.
 Let’s get started.
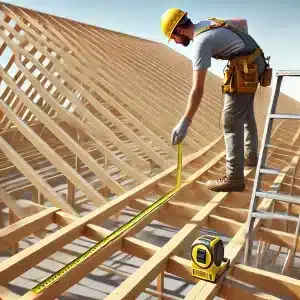
Measure your roof to determine how many shingles you’ll need. Proper ventilation is also essential. For a standard sloped roof, the ventilation ratio should be 1/300, while for low-sloped roofs or cathedral ceilings, aim for at least 1/150.
Measuring carefully is crucial. It’s a one-time task, so make sure you get it right from the start. Mistakes can waste both materials and time, so take your time and double-check your numbers.
1. Tools needed: hammer, roofing nails, utility knife, ladder, and tape measure
2. Materials and assembly
3. Wear personal protective equipment, which, for roofers, consists of the following:
4. Ensure adequate roof ventilation: 1/300 for average, 1/150 for low-sloped roofs.
Installing shingles is a detail-oriented, time-consuming process. Having everything ready would make things much easier.
Remove the old shingles by prying them off with a pry bar or roofing shovel. This can be messy and requires some effort, so be ready for a workout.
Always wear gloves and safety goggles. Take your time; roofing is not a task to rush. Safety comes first.
After removing the old shingles, clean the roof thoroughly. Clear away debris and check for any damage that needs fixing. A smooth surface is critical before adding new shingles.
Repair any rot or damage first for the best results. A clean roof ensures a strong foundation.
Install drip edges along the eaves to keep water away from the roof deck and protect your roof. Use galvanized nails to secure them.
A 28-gauge galvanized metal is recommended but check local codes. This step is important to prevent water damage, so do it right. Proper installation can greatly lower the risk of leaks and other water problems.
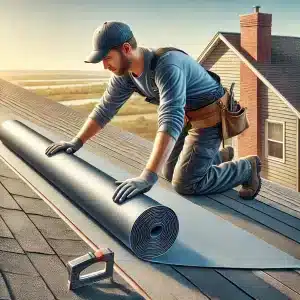 Roll out your roofing underlayment. It acts as a shield between the shingles and the roof deck.
Working from the bottom, layer them on one by one, overlapping. Secure it with roofing nails or staples.
An extra tip: IKO recommends open metal valleys for longer roof performance, so consider that when planning.
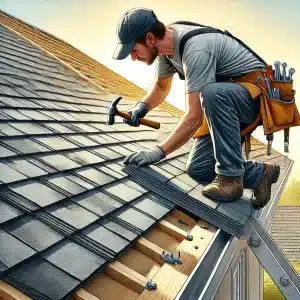
Time for the first row of shingles. Start at the bottom edge of the roof and make sure they hang over the drip edge by a half-inch or so.
Use roofing nails to secure them, but don’t nail too close to the edges.
You want a nice, snug fit.
Chalk out your shingle layout. This will keep your rows straight and even.
That little bit of prep work pays off in a big way in terms of headaches later.
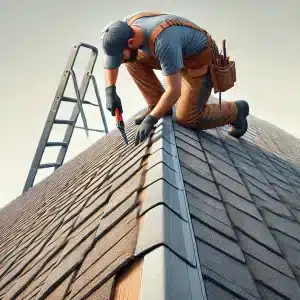
 With your layout done, keep on installing the shingles, row by row.
Overlap each row and stagger the joints so you don’t get any leaks.
Follow your chalk lines to keep yourself in line.
When you come to chimneys, vents, or any other structures, cut the shingles to fit snugly.
Use a utility knife, and remember to leave yourself room for flashing.
Flashing is key here, so use 28-gauge galvanized metal or something similar.
 Finally, add ridge cap shingles along the roof peak. These shingles cover the gap at the top of the roof and keep everything secure.
Cut the shingles into pieces long enough to overlap the top course by five inches on each side. This ensures proper coverage and protection against the elements.
Pick up all debris, nails, and any leftover materials.
A tidy worksite is a safe worksite, and it makes the finished job look that much better.
We’d love to hear from you. Reach out to us at Big Easy Roofing! Whether you’re an expert DIY-er or learning as you go, each project is a lesson learned. Allowing us to work with your roofing project can give you better results.
At Big Easy Roofing, we provide professional asphalt shingle installation with a focus on durability and precision. Don’t risk costly mistakes—reach out to us for guidance, materials, or full installation services.
Visit our blog for more roofing tips, or contact us today to get started with your asphalt shingle installation!
When it comes to home improvement projects, house and roof color combinations...
Read MoreIf you have gotten a roof repair quote in New Orleans and thought the number ...
Read MoreRoof coatings can significantly extend your roof’s lifespan, enhance energy e...
Read MoreA roof should be in top shape so that it could provide your home and family t...
Read MoreA new roof in New Orleans doesn’t get the same lifespan as one in, say,...
Read MoreHomeowners need to stay abreast of the latest roofing trends and products if ...
Read More


